|
“Scordatura” - alternate tuning. It’s not just for guitars. Scordatura is more common in music of the renaissance and baroque periods, when western classical music didn't have centuries of "standard practice" behind it. But it has been used in later music as well, such as the viola in Mozart’s Sinfonia Concertante (all strings tuned up to make the viola louder), or in Kodaly's Solo Cello Sonata in B minor (the C string tuned down to be able to play a low B). There is no one "standard alternate" tuning. Scordatura refers to any type of non-standard tuning: tuning all strings up or down, retuning one or two strings up or down, etc. Sometimes a string is retuned by a half step, sometimes a whole step, sometimes even more, though there's a limit. Tune a string too far down, and it becomes too flabby to produce much sound; tune it too high, and it will break. There are a few reasons why a composer might want to use Scordatura. It might make certain chords possible which can't be played with standard tuning, such as the crass open-stringed tritone of the solo violin in Saint-Saens' Danse Macabre. It might make an instrument sound softer or louder. (Retuning each string higher makes them tighter and therefore louder.) There might be other effects that can be achieved by retuning, such as in that jokester Haydn's Symphony #60, which stops mid-movement while the violins comically retune their G strings up from an F. Or it may be simply that the composer wants the instrument to play a note lower than its natural range. So, how does it work when you actually have a sheet of music in front of you? Well, there will be an indication at the top of the score showing what pitches to tune to, like this: 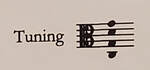 In this example from Bach's Cello Suite #5 in C minor, the top string is tuned down a whole step to a G. Usually, then, the musician plays as if the instrument is tuned in the standard way. Then this note, which is 3rd finger on the A string and normally a D:  ...is still played with the third finger on the same string, but is now a C. So for those of you with a good ear, you have to ignore what you're hearing until you get used to it. I found that it helped a lot to learn the suite first in standard tuning so you know how it goes, and then learn the Scordatura version. In this suite, some of the chords will be different - because you can - but it's pretty easy to figure out what to do. Here's a quick recording I made in my studio of the Gigue from the suite.
0 Comments
 In January we added to our “family” by welcoming Dorie into our home.
Lydia, our 3-year-old toy Aussie, is pretty dominant, and so while we had wanted a second dog for a while, the timing needed to be right and the personality of the new dog carefully chosen so it would be a good fit. I also was not keen on spending another year training a puppy. So we hesitated a long time, almost long enough that the door of opportunity had closed. Still, Lydia needed a playmate. She loved her days at doggie daycare back in Washington, and the more dogs the better. I’m pretty energetic and spend a lot of time with her, but still I am not enough. She gets bored and lonely. In October we moved into my parents’ upstairs in Chandler while waiting for our new house in Prescott to be finished. And they have two big dogs. Lydia was in heaven, not sure though about poor Tessie who was badgered relentlessly by Lydia to play. But for the most part, it was a great experience. And Lydia got used to living with other dogs. Tommy the big male was a gentle but firm leader who sometimes had to remind Lydia of her manners. She’s smart, she respects Tommy, and learned well. So in early January we realized it was now or never. A new dog could become part of the pack when Lydia was not the leader. And then we could move to a house that is new for both. So casually, we looked a little, not expecting anything, and fine if it didn’t. Larry really wanted another toy aussie, a girl. We had looked in the past out of curiosity and realized that a young dog (not a puppy) is very rare and often very expensive. And we had just bought a house and were facing big expenses like curtains and landscaping. And there she was! A breeder in northern AZ was looking for a home for her 10-month-old little girl. She had held onto her for longer because she was small and timid, and was now ready to let her go, to the right home, for a modest price. We drove a few hours north and met halfway in Seligman, and returned home with Dorie. There have been some challenges, of course. Dorie is afraid to eat around other dogs and needs to be separated, for now. We’ve had to retrain Lydia not to bark when people come to the door. And for several weeks Dorie wouldn’t play with Lydia, which was really frustrating for her and we did worry that they might never be good friends. But now, they only stop playing to eat or sleep! Best buddies. And in case you were wondering, yes, they are named after musical terms. The Lydian mode is a major scale with a raised fourth scale degree. And the Dorian mode is a natural minor scale with a raised sixth scale degree. You can ask me at your lesson to demonstrate. ☺️ I saw it three times at the park.
Every day, I take Lydia to the park for an hour in the morning and another 20 minutes in the afternoon. It’s how I keep her calm for lessons. ;-) This is a 25-acre, minimally maintained park surrounded by probably another 25 acres of wooded private property. Several of the regulars have seen coyotes and even had their dogs chase them into the woods. Early last Sunday, my friend Marilee and I were throwing balls into the pond for our dogs when another woman warned us that she had just seen a fox. I told her there are coyotes in the park, and was that what she had seen? And she replied, no, it was definitely a fox. To be honest, I was skeptical. But I had enough humility to keep an open mind. The very next morning I saw it again, and sure enough, it was definitely a fox. Because I am surrounded by people talking only about coyotes, I saw a wild dog and automatically thought “there’s a coyote”. We all do this and don’t even realize it. If, for example, you are surrounded by people who are saying “covid is deadly” then you will probably believe covid is deadly, regardless of the actual data. Here is that data, straight from the CDC (cdc.gov pandemic planning scenarios, scenario 5 - current best estimate as of March 19, 2021): Infection Fatality Rate (IFR) by age: 0-17 = 0.002% 18-49 = 0.05% 50-64 = 0.6% 65+ = 9% (The CDC should break this down further; I’ve read elsewhere that the majority of deaths in this age bracket are in people over 85. In other words, past the age of life expectancy. So if you are 70, your IFR might actually be 1%, not 9%.) This means that if you are an adult under 50, and get infected by the virus, your odds of dying are 1 in 2,000. Put another way, if 2,000 adults under 50 got infected, only one would die. For kids, it's 1 in 50,000. Fifty-thousand get sick, one dies, 49,999 recover. I'd be willing to bet that every single one of the children who have died had a serious underlying health condition. But what about the asymptomatic cases? Well then, the numbers are even better. In fact, the number of infections might be grossly underestimated because some people get infected but never get tested and never go to the hospital, and so the CDC doesn’t count them in those numbers. So your odds of dying might actually be 1 in 4,000 or 1 in 10,000. It’s impossible to know for sure. Here are some of the things you are more likely to die from than covid (again, from CDC data): Dementia/Alzheimer’s Cancer Accidents Chronic lung diseases Heart disease Diabetes Stroke Kidney disease Flu/pneumonia Suicide And so, if you do get infected with the virus, it is highly unlikely you will die of it. The vast majority of people recover. That's what the data shows… …If you are young (under 65) and healthy. There is always some truth in what you hear, even if a lot of it is inaccurate. There are some coyotes at the park, I just haven’t seen one myself. And yes, a lot of people have died of covid. Most of us have heard that there are factors that put some people at higher risk, some at much higher risk of dying of covid. Age is probably the biggest factor followed by obesity and poor health. The good news is that we all have some control over those factors, and I’m not talking about masks and staying away from others. Good food, good sleep, good activity levels, and good attitude…if you have all four, your odds of dying are probably 1 in a million. But what about "long covid"? Same answer. Take care of your body and it will recover. There is plenty of information out there to help people who have “long covid” recover completely. It is natural for us all to hold onto our perspectives, to be skeptical when someone says something new. But if you have just enough humility to keep an open mind, you just might see that it is a fox after all. And, it's mostly good news, folks, though you wouldn't know it watching the news or listening to the public health officials.
[Disclaimer: I am not a doctor, but I can read. I have a degree in sociology and another one in psychology, both of which taught me to do research, interpret data, and avoid logical fallacies; for example, correlation ≠ causation. These are my thoughts, and I recommend you also do your own investigating. I've included links at the end as a place to start.] First, children are not at risk from covid. I realize this is a controversial thing to say, but by the CDC's own data, it is completely true. A few hundred children (we're talking about people under 19 years old) have died in the pandemic, and that is tragic. Any death is tragic, especially when the person is young. But look closer at the data:
Second, there are things we all can do to stay healthy, and I'm not talking about staying home and getting vaccinated. Yes, getting vaccinated might be a good decision for some people, but it's not the only or maybe even the best way to avoid serious health complications or death. Here are just a few things we all can and should be doing:
Third, there are effective treatments:
It's too bad that our national conversation has been exclusively about case numbers and vaccination and avoiding infection, instead of what else might work and what we can do individually to improve our health. After all, living – really living – is more than just the avoidance of death. So let's embrace the good news - it's out there! _______________________________________________________________________ Here are some links that have helped me in my research: www.CDC.gov, covid-19 pandemic planning scenarios, table 1, scenario 5: current best estimate. This chart shows the latest infection mortality rates. New England Journal of Medicine, “The Major Causes of Death in Children and Adolescents in the United States”, Dec. 20, 2018. Quercetin and Zinc: Zelenko Treatment Protocol (August 2021) (onedaymd.com) Dr. Zelenko explains how zinc + hydroxychloroquine works against the virus - Dr. Vladimir Zelenko Treats Covid-19 With Hydroxychloroquine & Zinc - Dose Of Dr. Drew - Bing video The importance of Vitamin D for staying healthy - https://www.bitchute.com/video/InH89amCpy7S/?fbclid=IwAR1TXpbgOxo1cwI3hTX8oHP8KXDZ9cHxwgDMc00gqi2vbRL3vHkGrzQg9Ew From the NIH: Ivermectin is a safe, low-cost, and effective treatment for the virus - Ivermectin for Prevention and Treatment of COVID-19 Infection: A Systematic Review, Meta-analysis, and Trial Sequential Analysis to Inform Clinical Guidelines (nih.gov) Using ivermectin preventively - Human taking horse paste Ivermectin? - Bing video High Intensity Health – articles and videos about health - Articles - High Intensity Health | Mike Mutzel Viral immunologist demonstrates the effectiveness of masks - Do Masks Work? Viral immunologist Dr. Byram Bridle performs a simple experiment to see. - YouTube This evidence is backed up by graphs comparing case rates in regions with high mask compliance vs neighboring low mask compliance areas. My favorite signatory of the Great Barrington Declaration, Dr. Jay Bhattacharya, a public health policy scientist, talking with journalist Freddie Sayers in the UK - https://www.youtube.com/watch?v=ucfm9LCzLFM. What a kind and thoughtful man.  We have a new addition to the music studio: Lydia! For years we have had cats, including my beloved Sophie, her brother Watson, and their mother Stella. And so when the last two died last spring, it felt pretty empty over here. If you’ve ever had to put a pet down, you know how it leaves a hole in your life, your heart, and your home. With my husband’s illness and our planned travels in May and August, it seemed like good timing and so we endured the loss. I got in touch with a breeder of mini aussies who plans on having a litter ready to adopt in December 2019. We put ourselves on the list for a female, black and white mini. And then, I got this picture in a text from our son Jamie, with the words “Look what Grandma and Papa have!” Oh my, something was up. They already have two big dogs. And we were due to arrive at their house for a visit in a week. My dad teaches piano at ASU, and one of his doctoral students bought a puppy for her children to play with while she practices long hours. Unfortunately, potty training was a challenge in these circumstances, and so at four months the pup was still making messes all over the house. Stressful! And so, knowing that my parents are great with dogs, she asked them to take her. She just happens to be a female, black and white mini aussie. Perfect! And so Lydia came home with us. It’s a little earlier than we were planning on, and 90% of her care (and exercise!) falls to me. However, she has quickly and thoroughly filled the hole in our lives, our hearts, and our home. Yes, we have had to work hard to get her potty manners under control, but because her first family’s children played violin and cello, she settles nicely during lessons (as long as we ignore her). Priorities, people! We were out for a walk the other day, and I saw a front doormat that said “I hope you like cats”. I need one that says “I hope you like dogs” because when you come for your lesson, you can count on a warm welcome from our sweet, extraverted little Lydia. She loves you all! And hopefully one of these days I’ll get her to keep all four paws on the ground when you arrive. 😊  I haven’t written much over the past two years because my husband has been fighting a long illness, and then last May we ended up with a puppy. So free time has been in short supply!
However, I remembered a finger independence exercise from my childhood last week when I was in a lesson with my student Evie. I don’t know what it’s called, so we named it “Second Finger Sit-Ups”. Evie is at the point in her beginner book when she is playing tunes with both high and low 2nd fingers, sometimes back-to-back or with just a note in between. She has a great ear, but her fingers don’t always do what they are supposed to. And so, Second Finger Sit-Ups: With just the left hand (no bow), place your 1st finger on the D string (on an E) and your 3rd finger on the A string (on a D). Then move your 2nd finger back and forth from F# (high 2 on the D string) to C natural (low 2 on the A string) while keeping the 1st and 3rd fingers down. Go slow at first, and make sure your hand stays relaxed. Tapping your thumb while keeping the fingers down helps release the tension, and imagine your left hand hanging on the fingerboard by the tips of your fingers. Use your 1st and 3rd fingers as guides for where to put your second finger: high 2s just behind the 3rd finger and low 2s just in front of the 1st finger. And you don’t have to raise the 2nd finger very high – just enough to move it cleanly to the next string. Be sure to tap the 2nd finger on the tip, inside corner, and keep all your fingers round and relaxed. Evie had trouble at first lifting and lowering the 2nd finger. It’s like you’re looking at the finger, but it won’t move and you don’t know why. Try touching the top of the second finger to help your brain make the connection. At first it feels a little like the first time you tried to tap your head and rub your stomach, but if you go slowly and do it a little every day, you’ll get it.  I usually write about music and teaching music, but this is one for the “running the business” side of having a music studio.
Like many private studio teachers, my students come to the house. I love this arrangement. There is no commute. I can grab a cup of coffee between students or throw in a load of laundry. I get to keep all the money rather than pay a percentage or rent to a commercial studio or music store. But there are downsides. My teaching hours are restricted to those times that don’t disrupt the rest of the household, which for me means no evening or weekend lessons. I have to keep the house clean and neat and the lawn mowed. Morning students sometimes get a whiff of breakfast bacon and coffee or dinner in the crockpot. And we have cats. My husband happens to be allergic to cats. But before you conclude that he is being a hero and a martyr to my desire for cats, let me point out that I am a dog person. He is the cat lover, so we have cats because he wants them. And in order to make this work, we discovered Ace Allergy Drops, which also happens to benefit my students and their family members who are also allergic to cats. Here is how it works. People are generally not allergic to the actual fur or dander on cats, they are allergic to the protein in the cat’s saliva which gets all over their fur when they clean themselves. And someone very clever discovered that if you give cats a very low dose of acepromazine (a pet tranquilizer) they stop producing that protein in their saliva. The formula: one 5 mg acepromazine tablet crushed up and dissolved in 30 ml (one ounce) of distilled water. Store it in the refrigerator and shake it up before adding about 5-6 drops to the cat’s food once a day. It should take effect within 2-4 weeks. You’ll need a prescription from your vet. Ours was skeptical, but was willing to make up the solution for $30 a bottle, which lasts us about 3 months. We have not noticed any behavioral effects on the cats – no lethargy (well, aside from the fact that they are cats), no tendency to get sick more easily, no dullness in their emotional connection to us. They still hate each other. They are utterly themselves, even with the drops. About a month ago we were really busy with back-to-back trips and visits from family when we ran out of the drops. My husband said he didn’t think they were working anyway, so I didn’t get the prescription refilled. Then the mother of one of my students asked me at the end of a lesson if we were still giving the drops to our cats. Her nose was runny…. Yay! They do work.  When someone decides to start taking violin or viola lessons, here is the typical list of equipment:
For some reason, music stores and music teachers talk a lot about the different kinds of shoulder rests available and how to adjust them to fit the shape of your shoulder. But we almost never talk about the importance of getting the right chin rest, even though they are easy to replace, inexpensive, and play a critical role in how comfortably you can hold up your instrument. Most chin rests mount to the left of the tailpiece, even though only about 30% of the population fits this style. The rest of us need some version of the center-mount chin rest, because that is where our jaws naturally fall when the instrument is properly balanced on the left collarbone. (Btw, it really should be called a “jaw rest”. You don’t put your chin on it, you rest the side of your jaw on it.) Even if you need your chin rest on the left, there are several different shapes available and the one you have on your instrument might not be the most comfortable for you. I’m currently teaching a beginner viola class at an elementary school (a terrible way to learn a stringed instrument, btw, but we do our best for the kids who will never take private lessons) and for most of these kids, holding their instruments correctly is really uncomfortable. They try to adjust by holding the viola in front, “viola beard” style, because it doesn’t hurt that way. How do you tell a kid that even though it hurts, they are doing it right? “Play” is supposed to feel good, not hurt. That goes for playing an instrument too. And so, I wish that every music store that rents violins and violas would stock a good variety of chin rest styles, and that they would spend time helping the student get the right chin rest for them, just as they make sure the student gets the right size instrument and the right shoulder rest. It should be a standard part of fitting a student to the right instrument. Here’s how it works: Have the student stand facing you. Tell her not to move anything, but to let you place her hands/arms/head around the viola. Balance the instrument on her left collarbone, all the way against her neck, parallel with the floor, at a 45° angle. If you are standing in the middle of the room facing a wall, the scroll should point into the front left corner. Place the student’s left hand in playing position with the palm of her hand up against the shoulder of the viola and her fingers hovering like an umbrella over the strings. Have her move her head up and down and side to side (like saying “yes” and “no”) to make sure her head is comfortably upright and centered. Then help turn her head slightly to her left and gently rest the left side of her jaw down on the instrument. Her head should drop just an inch, and the natural weight of her head should make it easy for her to hold the viola up with her arms down at her sides. Is the current chin rest cupping her face comfortably? Or is it off to the left, and her jaw comes down on the edge of the chin rest, or sits on the tailpiece? Does she instinctively want to stick her chin out, or cock her head, or move the viola higher on her shoulder or down in front of her? Try different chin rests until you find the one that sits directly underneath her left jaw and feels comfortable. It should feel to her like the viola is nestled comfortably, not pulling away from her. There should be no sharp edges poking under her jaw or hard lumps pushing her head out of the way. She should be able to turn her head to look forward and back down the fingerboard. Here are several styles to try: https://www.sharmusic.com/Accessories/Chinrests/ If you are renting your instrument, keep the chin rest that came with it somewhere safe so that when you return it, you can put it back on. Contact me if you have any questions. 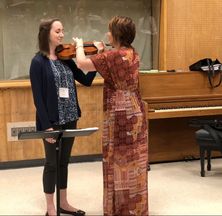 Brenda demonstrating how to set up a new student's hold Brenda demonstrating how to set up a new student's hold This summer I was able to take a break from teaching and be a student for 10 days. The Indiana University Jacobs School of Music has an annual summer violin & viola teachers’ “retreat” – but as intense as it is, there is no retreating about it. I came home with a thick binder, a notebook full of notes, and a head exploding with information to apply to teaching my own students. It was very good, but it is going to take me a while to process it all. Though I live in the Seattle area, I just happened to be in the Midwest the week before the workshop at my parents’ 60th anniversary party at the south shores of Lake Michigan, not far from their hometown of South Bend. The lake house where we were staying was just a half day’s drive south to Bloomington for the workshop. I got up early Friday morning, missing the first half day of the workshop and the last 2 days of my family’s reunion. No one else was up except my husband and parents to see me off. And as I was closing up my suitcase, I saw a tick. Then discovered one on the back of my neck. Took off my blouse, and found two more! Thankfully my husband was able to confirm that there were no more on me while my parents went through my stuff. I didn't find any more ticks, but I was still a bit rattled when I arrived at the workshop, having missed the orientation and barely making the first lecture Friday afternoon. But Brenda Brenner, who manages the workshop and is a friend of mine, gave me a hug after her lecture that afternoon. Brenda is a pedagogy professor at IU and founder of The Fairview Violin Project, which is a public school program that teaches beginning violin classes in a Title 1 school near Bloomington, IN. Brenda and I played in the youth symphony quartet together back in high school. And she went to the prom with my brother Greg. 😊  (L-R) Martyn, Andrew, & Rebecca (L-R) Martyn, Andrew, & Rebecca And then at dinner, I happened to sit next to Rebecca Henry, one of the workshop's professors. As we talked, we discovered that we are both from South Bend; that her parents went to all my dad’s concerts when we lived there in the late 60s/early 70s; and that her sister Ruth was a friend of mine in elementary school!  Mimi demonstrating a shifting exercise Mimi demonstrating a shifting exercise The workshop is headed by Mimi Zweig, renowned pedagogy expert at the Jacobs School, founder of string academies in Wisconsin and at IU, and former teacher of violinist Joshua Bell. (Here is Joshua while he was studying with Mimi; and here is Joshua as an adult.) Her eclectic mix of theoretical approaches includes Suzuki, Paul Rolland, and several others as well as her own thoughts on setting up a "non-judgmental environment" for students to learn.  And then there were several other pedagogy professors from around the country, all proteges of Mimi’s. My group and private teacher for the workshop was violist/violinist Jim Przygocki from the University of Wyoming and founder of the UW String Project. (Are you seeing a pattern here?) Such a nice man and an excellent teacher! His wife, violinist Sherry Sinift, also gave some of the lectures and played on one of the several excellent concerts we were able to attend. All of the professors at the retreat are involved with community string programs, including Rebecca Henry. She teaches pedagogy at Peabody Conservatory in Baltimore and is also the founder of ViolinPractice.com. Also teaching at the workshop were Elizabeth Zempel and Bonnie Greene, both experts in teaching young children and both from Wisconsin. Bonnie has collected folk tunes from all over the world and publishes her own collections and others' string music at One World Strings. 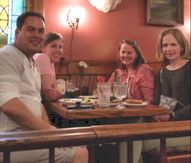 I don’t know about previous summers, but this year was quite international. There were several from Canada who are involved with El Sistema, a music education program that started in Venezuela to teach children from the slums. There were teachers from Korea, Japan, Australia, Spain and Portugal, Brazil, and India, as well as several states in the US. This summer also drew a lot of young teachers in their late 20s to early 30s. There were a few around 40, and then the three of us "older" ladies: me, Sarah from Muncie, IN, and Jane from Prestwick, Scotland. All three of u are on our second (or third) careers and set up our teaching studios two years ago. It was lovely to get to know these women! We were often joined by our friend Paul from SoCal. Here is a picture of the four of us at the Irish Lion in Bloomington. And here are Jane and Sarah:  On the last day of the workshop we all gathered at Mimi’s house for our last session (Kreutzer etudes!) and brunch. We got a chance to chat with the professors more, and I was surprised to learn that they thought this workshop would run for a few years and then stop – because there would be no more teachers interested. But every summer they get a new crop of about 30-35 teachers, even now after a couple of decades. I hope they continue. It is excellent. If you are interested in attending the workshop and have any questions about my experience there, feel free to contact me. 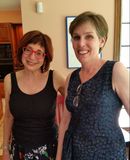  Somehow, the word “discipline” has become synonymous with “punishment”. Corporate HR departments and public school administrations have “disciplinary procedures”: the process to follow when someone breaks the rules. A parent might be referred to as a “disciplinarian”, meaning they are the parent who punishes you when you disobey.
This isn’t particularly new. In fact, Merriam Webster says that in the 13th century, the term referred to religiously inspired punishment, such as self-flagellation. These are probably the same people who misunderstood the proverb “Spare the rod and spoil the child.” More on that in a minute. In my opinion, all of this is a misunderstanding of the word. Just as “discipline” sometimes refers to a body of knowledge or field of study, the word originally referred to the activities of a student who is learning something or following a particular teacher. That student is a “disciple”. Learning something well requires regular, consistent, persistent, and sometimes repetitive action. This is discipline, and it takes time. No punishment is needed, just motivation to do it, do it correctly, or at least do it better than the last time, and keep on doing it. Few things in life require as much discipline as learning to play an instrument. This is one of the reasons why music students score higher on their SATs, do better in math and science classes, and are pursued by law schools and med schools. In order to succeed in learning an instrument and getting good at it (where the fun really begins) you have to have developed a capacity for discipline. Therefore, you are already used to the dedication needed to study law (so much reading!) or medicine (long, long hours) or any body of knowledge that takes concentration over a long period of time. One of the hardest things I do as a violin teacher is teach my students how to practice. It isn’t consistent with our culture to stop playing with your friends, or turn off the video game, and go practice. Alone. Doing something that, at first, feels awkward and sounds terrible! And later, it sometimes feels like a journey that never ends. It's hard to notice improvement, which would be so encouraging if it were obvious! I don’t believe in punishment for failure to practice, by the way. That “rod” that we’re not supposed to spare was originally referring to a shepherd’s crook. And a shepherd would never use his rod to hit his sheep! If he did, he would either damage them or chase them away. He might use the rod to hit or threaten a predator, but for the sheep, the rod was for guiding and keeping them on the path and moving in the right direction. This is what a good parent does. Parents play an important role in helping their child to practice – not being there with them, though occasionally that is a good idea, but creating the conditions that make good, consistent practicing possible. Parents can help by setting aside a space that is relatively free from distractions (the TV isn’t on 20 feet away), setting a regular time every day that doesn’t conflict with other desirable activities (“We’re going to the park to play; you stay here and practice.”), reminding the student that it’s time to play violin, and not tolerating excuses. Here are some ideas I have come across that might work for you:
I once heard discipline described visually in this way: Water is the talent. The riverbanks are the discipline. If you have no riverbanks, you have a swamp full of stagnant, smelly, muddy water. But if you have good boundaries, the water flows – sometimes very rapidly – in one direction, eventually reaching its goal. |
AuthorQuodlibet: A piece employing several well-known tunes from various sources, performed either simultaneously or in succession. (Schirmer Pocket Manual of Musical Terms) Archives
September 2022
Categories |
 RSS Feed
|
2024 Bryn Cannon
|